I’m going to show you how to create a Hello World web app with React.
Note: I’m using React 18, which is the latest version at the time of this writing.
1 – Install VS Code
VS Code is a really good IDE for developing React apps. So first things first, go download and install React.
Note: After it installs, I suggest leaving VS Code closed until after you’ve installed Node.
2 – Install Node
We’ll be using Create React App to initialize the React app with good tools and configuration. In order to use this, download and install Node.
3 – Create React App
In this step, we’ll initialize the React app with the create-react-app command.
First, in VS Code, open the folder where you want to put the React app (such as C:/Projects). Note: This is so the terminal defaults to the project folder, and so the newly created app shows up in VS Code right away.
Now create the React app:
- In VS Code, open a terminal (from menu: Terminal > New Terminal).
- Execute command:
npx create-react-app hello-world-app
Code language: Bash (bash)
Note: If it’s saying ‘npx doesn’t exist’, close and reopen VS Code.
- If this is the first time you’re running this, you’ll see this prompt. Enter “y”:
Need to install the following packages:
   [email protected]
Ok to proceed? (y) yCode language: plaintext (plaintext)- This has to install a lot of stuff so it takes a few minutes. While it’s installing, you should see something like this, including the progress bar (nice!):
Creating a new React app in C:\Projects\hello-world-app.

Installing packages. This might take a couple of minutes.
Installing react, react-dom, and react-scripts with cra-template...

[#########.........] - idealTree: timing idealTree Completed in 46945msCode language: plaintext (plaintext)- When it’s finished creating the app, you’ll see the following information:
Success! Created hello-world-app at C:\Projects\hello-world-app
Inside that directory, you can run several commands:

  npm start
    Starts the development server.

  npm run build
    Bundles the app into static files for production.

  npm test
    Starts the test runner.

  npm run eject
    Removes this tool and copies build dependencies, configuration files
    and scripts into the app directory. If you do this, you can’t go back!

We suggest that you begin by typing:

  cd hello-world-app
  npm start

Happy hacking!Code language: plaintext (plaintext)
This is quite helpful information, so I’m displaying a lot of it above for your reference.
Note: If you don’t see the app in VS Code’s Projects list, open the app folder that was just created (i.e. C:/Projects/hello-world-app).
4 – Start the app
From the terminal in VS Code, go to the app folder and start the app:
cd hello-world-app
npm start
Code language: Bash (bash)
Note: To quickly open a new terminal started in a folder, right-click the folder (in Projects) and then choose ‘Open in Integrated Terminal.’
This compiles the app, starts the web server (webpack), and launches the app in the browser. This could take awhile. When it completes, you should see something like the following information:
Starting the development server...
Compiled successfully!
You can now view hello-world-app in the browser.
Local: http://localhost:3000
Note that the development build is not optimized.
To create a production build, use npm run build.
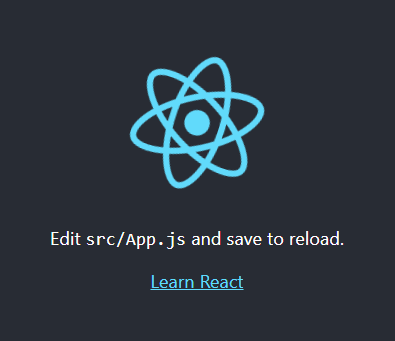
webpack compiled successfullyCode language: plaintext (plaintext)The browser should be opened to http://localhost:3000 and it should be showing the following:
5 – Modify the app
Your React app’s entry point is /src/index.js. This initializes the app by rendering the App component. In this final step, modify the App component to make it say “Hello World.”
- The App component is defined in /src/App.js. Open this in the editor.
- Let’s clean it up and make it say “Hello World”:
import logo from './logo.svg';
import './App.css';

function App() {
  let greeting = "Hello World";
  return (
    <div className="App">
      <header className="App-header">
        <img src={logo} className="App-logo" alt="logo" />
        <h3>{greeting}</h3>
      </header>
    </div>
  );
}

export default App;

Code language: JavaScript (javascript)- Save the file.
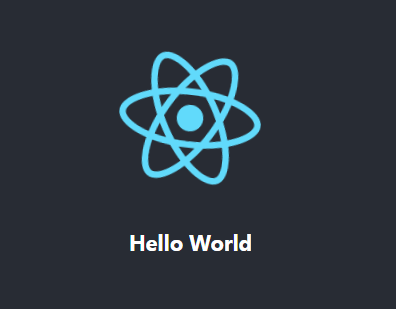
Notice that when you save, it automatically recompiles and the changes show up in the browser:
This is significantly faster than starting the app again (with npm start). This functionality comes from webpack (auto installed by Create React App), which watches for changes.
Now that you’ve created a React app, I suggest getting data from an API and displaying it!