Mapping classes to WinForm controls manually is probably the most tedious thing you can do in coding. In order to minimize this coding effort, you can bind your controls to an object data source.
In this article, I’ll show how to do this in a WinForms App (.NET Core+) project. First, I’ll show step-by-step how to configure binding through the UI (in both VS2019 and VS2022). At the end, I’ll show how to configure binding programmatically.
1 – Add a class
Add a class with public properties that you want to bind to the form controls. To keep this simple, we’ll add a class with a single string property that we want to bind to a textbox.
public class Coder
{
public string Name { get; set; }
}
Code language: C# (cs)2 – Add a BindingSource
Add a BindingSource control to the form and set your class as its object data source. This allows you to bind controls to your class properties at design time. The steps for adding a BindingSource like this are different for VS2019 and VS2022, so take a look at the appropriate section below.
In VS2022
To add a BindingSource with an object data source in VS2022:
- Add a BindingSource control to the form.
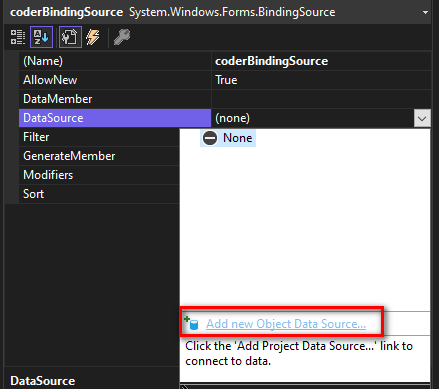
- In the BindingSource properties, click DataSource and Add new Object Data Source
- Select your class from the list and click OK.
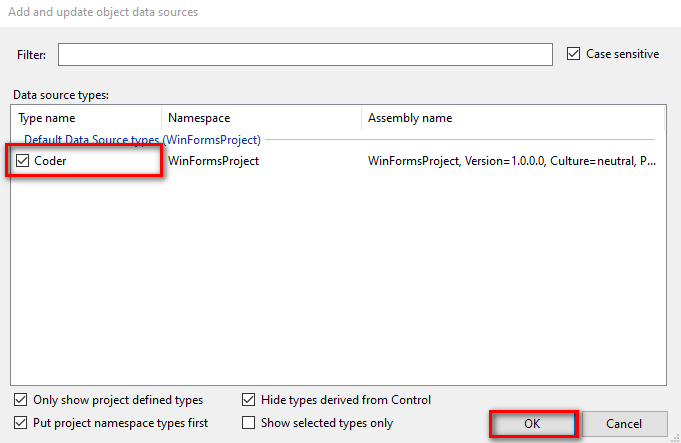
Note: If you don’t see your public class, rebuild the project and try this step again.
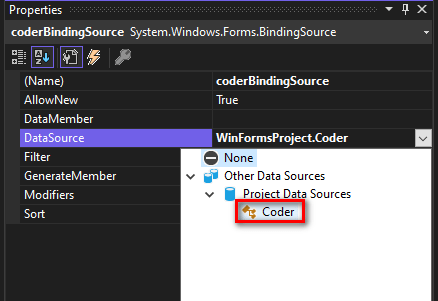
- In the BindingSource properties, click DataSource and select your class (Other Data Sources > Project Data Sources > Coder).
In VS2019
To add a BindingSource with an object data source in VS2019:
- Add a file to the project called Coder.datasource with the following XML (with your own class type info):
<?xml version="1.0" encoding="utf-8"?>

<GenericObjectDataSource DisplayName="Coder" Version="1.0" xmlns="urn:schemas-microsoft-com:xml-msdatasource">
  <TypeInfo>WinFormsProject.Coder, WinFormsProject, Version=1.0.0.0, Culture=neutral, PublicKeyToken=null</TypeInfo>
</GenericObjectDataSource>
Code language: HTML, XML (xml)
Note: This is necessary because VS2019 doesn’t have the “Add new Object Data Source” wizard.
- Add a BindingSource control to the form.
- In the BindingSource properties, click DataSource and select your class (Other Data Sources > Project Data Sources > Coder).
If it won’t take your click, double-check the class type info in the Coder.datasource file and rebuild.
3 – Bind a control to a property via the BindingSource
- Add a TextBox control to the form.
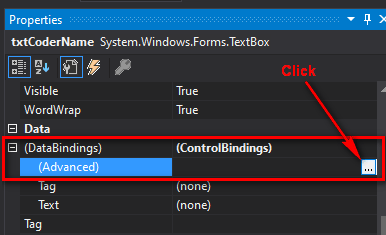
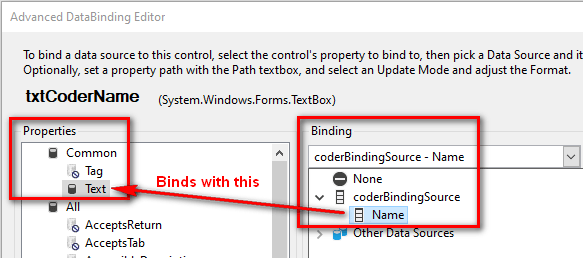
- In the TextBox’s properties, click Data Bindings > Advanced > click the […] button.
- Select the properties to bind and click OK. In this example, we’re binding coderBindingSource.Name with the TextBox.Text property.
4 – In the code, set BindingSource.DataSource to an object
Now do the binding by setting BindingSource.DataSource to an object, like this:
public frmCoder()
{
InitializeComponent();
var coder = new Coder() { Name = "Bob" };
coderBindingSource.DataSource = coder;
}
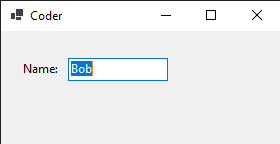
Code language: C# (cs)This binds to the Coder object when the form initializes and shows the Coder.Name in the bound textbox:
You can get the initial object data from anywhere, such as: querying the database, reading a config file, getting JSON with HttpClient, or even hardcoding it. Just be sure to set the BindingSource.DataSource when you have a new instance.
Configure the bindings programmatically
You can add bindings programmatically by calling IBindableComponent.DataBindings.Add(), like this:
public frmCoder()
{
	InitializeComponent();

	var coder = new Coder() { Name = "Bob" };
	txtCoder.DataBindings.Add(nameof(TextBox.Text), coder, nameof(Coder.Name));
        //This means bind coder.Name -> txtCoder.Text
}
Code language: C# (cs)
Note: Watch out for adding the same binding twice. This will cause a runtime exception. If you’ve added bindings through the UI already, be sure to remove them if you’re doing this programmatic approach.
When the form is launched, the textbox shows “Bob” (from Coder.Name).
Auto-binding programmatically
To automatically bind controls to class properties, loop through the controls and call DataBindings.Add() on each control. Here’s an example:
var coder = new Coder() { FullName = "Bob" };

//Auto-bind by naming convention (coder.Property.Name == control.Name)

var coderPropNames = coder.GetType().GetProperties().Select(t => t.Name).ToHashSet();
foreach (Control control in this.Controls)
{

	if (!coderPropNames.Contains(control.Name))
		continue;

	switch (control)
	{
		case TextBox txt:
			txt.DataBindings.Add(nameof(txt.Text), coder, txt.Name);
			break;
		//add other control types here
	}
}
Code language: C# (cs)
Note: With this overly simple naming convention, you’d probably run into a naming collision at some point. This results in a rather confusing compile-time error (ex: “Cannot convert from string to Control’). The control names can’t be the same as existing form property names (i.e. can’t use “Name” because form.Name exists).
Of course, the risk here is the control names and class property names could get out of sync. If you’re going with this approach, consider trying to detect these scenarios ahead of time, so you don’t have to spend time debugging in the future.